Friday, December 30, 2016

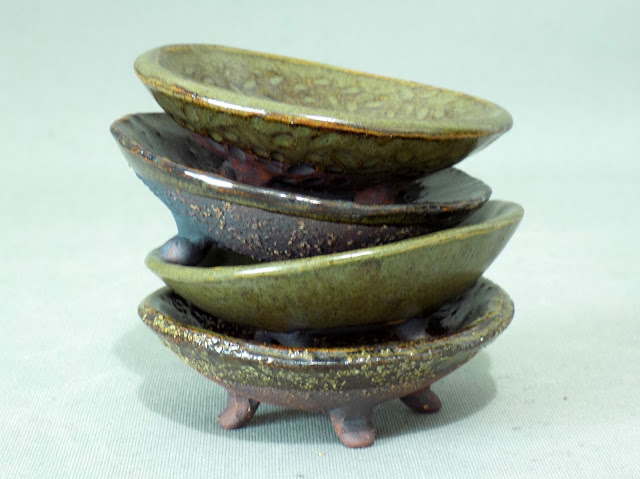
My Little "Cow Udder" Accent Bonsai Pots

NEW WEBSITE :   Fionna's Bonsai Pots

I'm using a new website for both Blog Posts and for Selling my Bonsai Pots.   Click the above blue link to be redirected. Thankyou.

_____________________________________These little accent bonsai pots make me smile. 

It wasn't until we were sitting out in the garage having a chat that someone commented that those pots looked a bit like "cow udders"

From that moment on, they are affectionately known to me as the "Cow Udder Pots".  For those of you not familiar with the term, it refers to the mammary glands on a cow (teats)......the place your delicious milk comes from! 
 Definitely Kiwi Style Pots.
We don't seem to use too many accent pots  when we display our bonsai pots here in New Zealand.  We do see the odd one, I suspect it's an area that we need to learn more about.

Regardless, they are lots of fun to make.

Sunday, September 18, 2016

Needed These Bonsai Pots Dried in a Hurry!

NEW WEBSITE :   Fionna's Bonsai Pots

I'm using a new website for both Blog Posts and for Selling my Bonsai Pots.   Click the above blue link to be redirected. Thankyou.

_____________________________________What do you do when the kiln needs to be fired and you've got no little pots to fill in all the wee spaces on the shelves?
Answer:  Quickly make a batch of little ones up, put them on a couple of Hardy Plank bats, on top of a nice warm fire.

Within half an hour or less they had firmed up to leatherhard, were trimmed up, rivots added, and put back on the fireplace for another hour or two.
Hey presto.....they were ready to load into the kiln with the other pots tonight.

Not something I recommend to do normally, but with these very small bonsai pots a "quick dry" doesnt seem to have any detrimental effects (cracking)
WARNING:  You'll sweat like crazy if you're inside....was a warm mild day, so didnt really need the fire going at all!

These little "uns were placed in all the wee nooks and crannies on the shelves along with all these other larger ovals.
Happy days!!

Monday, September 12, 2016

REPOTTING MY LOVELY OL' CEDAR

NEW WEBSITE :   Fionna's Bonsai Pots

I'm using a new website for both Blog Posts and for Selling my Bonsai Pots.   Click the above blue link to be redirected. Thankyou.

_____________________________________I've had this lovely ol' cedar since I was 17....I found it on the rubbish dump at the Nursery I was an apprentice at.  A scrawny bent up looking thing, more dead than alive at the time, but it had something about it that made me "rescue" it from imminent death.

Now 30+++++ years later we are still together. According to the label down the side of the of the pot, it had last been repotted in  2012.

I'd thought it would be difficult to get it out of the large pot as the top was curved inwards.  After raking out the outside edge of dirt I got the old bread knife out and cut straight down, releasing any roots growing into the curved edge.                                                          
Surprisingly the soil was almost bone dry.  The cedar canopy had kept most of the rain off.  Even during the winter I suspect the rootball was suffering from dryness.  It made taking the old soil off quite a bit easier.
The roots were trimmed back quite a bit.  It was soaked in water for about 15 minutes as it was bone dry.
There was only 1 large drainage hole in the pot bottom.  Sometimes if the pot isn't sitting dead flat, water will pool in one side.  So I put a reasonable later of pumice down first to stop the roots sitting in water if this happens.  Then a layer of soil.  This cedar seems to prefer more of a peaty based soil, rather than the free draining bark/pumice/grit type mixes.  It has worked for the last 30 odd years, so I'm not going to change it now.....goes against all the potting mix rules, but it works for this one.
All done......for the first time.  Needless to say that it was now alot heavier than before.  I have learnt to always wait for help when shifting something this size......otherwise you will end up having to repot it twice!   I will remember this for next time in 4 or 5 years!!
 She was put in the shade, with just a bit of sun for a couple of hours in the morning.
This is the view from the top showing just how dense thick and wide the main foliage pads are.  They are just going to get wider and wider unless I keep pinching them back.   It's a darn shame our annual demonstrator workshop was cancelled, I could have done with a bit of expert advice.....oh well, guess its back to looking at You tube and the Internet for some hints.


Tuesday, July 5, 2016

TEXTURE ON BONSAI POTS n SLABS

Everyone knows I love texture on my bonsai pots and slabs.

NEW WEBSITE :   Fionna's Bonsai Pots

I'm using a new website for both Blog Posts and for Selling my Bonsai Pots.   Click the above blue link to be redirected. Thankyou.

_____________________________________Glazes have their own special look, but to physically texture clay by hand is a special thing.

This slab is an example of that.

It was textured on the top and bottom.  Here's a closer look
The best looking textures in my opinion are the ones that look quite random.  Just have a look around....it might be some bark off an old tree, a nice looking stick, a crumpled up piece of paper.  All are great for making textures in wet clay.   Well worth the effort.
At 48cm long, it's just on the verge of what my wee kiln can handle.   Funnily enough I have no trouble making a large slab, but ovals are a different cup of tea!

Thursday, May 26, 2016

FANTASTIC AFTERNOON AT OUR GORE BONSAI CLUB WORKSHOP

NEW WEBSITE :   Fionna's Bonsai Pots

I'm using a new website for both Blog Posts and for Selling my Bonsai Pots.   Click the above blue link to be redirected. Thankyou.

_____________________________________This little beastie had been sitting outside in front of a table for the last 3 weeks.  Slowly but surely it's leaves were starting to fall.  It had been left for a year or so to do its own thing.
I figured I could take it along to the Gore Bonsai Club workshop on Sunday and get some work done on it.  Might be good for some of the other members to work on a larger tree??
There was the odd look when I walked in with it...."what on earth are you going to do with that?"  Little did they know that they would be answering that question themselves.
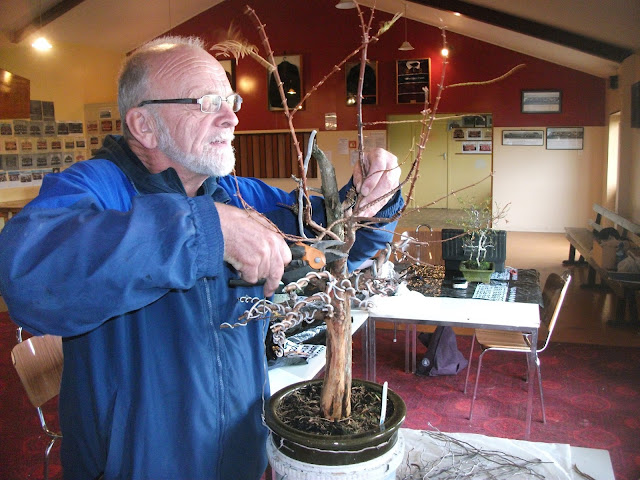
As there were only 5 of us there, we decided to work on this Dawn Redwood as a group. The leaves were  taken off (most just fell off) and the bark was cleaned up.  The colour of the trunk was quite amazing, a beautiful reddy brown colour. 
Where do you start!   We started by taking out all of the 3 D's - dead, diseased, damaged first.  Then any branches that crossed and couldn't be wired into another area.  We cut the top off as it was nearly 4 foot high.
I love this pic....it conveys the feeling of "holy heck...where do I start!"  This was the ideal chance for some to practise their wiring skills.  Some of the thick wire used was a bit of an overkill, but there were some quite stubborn branches.
Various ideas and opinions were tossed back and forwards - "take this branch off", "leave it on and shorten another one", "where should the front be?".   If we'd all had the same tree to work on individually,  each and every one would look totally different at the end. (Another idea for a workshop maybe)
The wee tree just kept getting smaller and smaller.  Lots of  wire was used. Pete gave one large awkward looking branch the chop!
The plain aluminium bonsai wire looks rather prominent and jumps up catches your eye waaay too much....a good reason to only use the brown coloured wire as it "blends in" a lot better.
 The group should be proud of what they achieved....the top of the trunk is dead and will need a bit of carving to be done at a later date.   To date, the group had only really worked on smaller trees and it was interesting that they made the comment that it was easier to work on a larger one.
We must do this again, it was fun working on a large tree together rather than everyone doing their own thing individually.  I've been in the club for a few years now, and can't recall any of us doing that before.   Roll on the next workshop!!


Saturday, May 7, 2016

Bonsai Garden Having a Tidy Up

NEW WEBSITE :   Fionna's Bonsai Pots

I'm using a new website for both Blog Posts and for Selling my Bonsai Pots.   Click the above blue link to be redirected. Thankyou.

_____________________________________It's May now (late autumn/early winter)....you wouldn't know it by the warm temperatures we've been having recently.  I decided it was well and truly time for a bit of a tidy up in the garden.
There seemed to be more green on the ground than on my bonsai.  Time to weed, take old leaves off and think about what would need a good trim up just before spring.

You can actually see the path now that all that "bug repellent" plant has been removed.  These will all stay on the ground over the winter.
There's a group of 9 larch here that'll be made into a group planting this year.  They aren't much to look at individually, but might make a nice looking bonsai forest.  There's a mixture of larix decidua and kempferii, the difference isn't too noticeable, just the colour of the buds.
I had to dig these two pots out with a spade. These dawn redwoods are moisture lovers and don't care how they get it!  You can tell they weren't turned regularly.

The bottom of this plastic pot wont last another year.....looks like I'll have to make one for it.
I came across this pine that had been left to its own devices for the last couple or three years.  Lots of old dead needles to remove.  It's starting to look quite leggy and I've been tempted to cut the shoots back......but what is the right time of the year to do that.  I know there is a big difference depending on whether its a black or white pine.   All I know about this one is that the needles are in bundles of 2, so its not radiata(3) or white pine (5)
Looks 100% better tidied up.
It's times like now that I wish there was an experienced bonsai enthusiast handy.  I have a rough idea what I want the tree to look like, but it would be nice to have another opinion and a bit of a hand.  Its hard to learn when there's no one to bounce ideas off.  The Internet is good, but it'll never take the place of a face to face discussion...especially for a "hands on learner" such as myself.

It had that literati style look about it, but is now quite overgrown and tall.  I'll put it close to my cuppa tea seat and study it over the next week or two.....any suggestions greatly appreciated.
Looking at another 20degree day tomorrow, perhaps the back half of the garden might get some attention....nice way to spend Mothers Day I think.


Sunday, April 17, 2016

Bonsai Wire - How to Waste Away a Couple of Hours

NEW WEBSITE :   Fionna's Bonsai Pots

I'm using a new website for both Blog Posts and for Selling my Bonsai Pots.   Click the above blue link to be redirected. Thankyou.

_____________________________________Yes I know all the experts say to cut your bonsai wire off and not to unwind it.
Easy enough to do, but gosh what a WASTE!

Being from Scotish descent, this didnt go down well with me.  Ever since I first ventured into the hobby of bonsai, it amazed me to hear and see "experts" that never reused bonsai wire. Yes, I know the reason - it can damage the fragile outer layer of bark as its unwound.  But by not doing it, it can also damage the bank balance, and the frustration of not having enough wire left to finish a tree!

I'm the first to admit that I'm too much of a scrooge to throw out bits of cut off wire when if you're really careful you can unwind that aluminium wire and reuse it.

Mind you.....after a couple of hours hunched over the edge of the couch unbending and straightening a box full of the stuff that the thought of using nice new wire was starting to appeal.

Yep, I straightened out every last little piece of wire, although I suspect some of the really tiny lengths will probably never be used again. (had my "fury helper" again, he loves box's)

I had the opportunity to purchase some wire from a Gore Bonsai Club member that passed away nearly a year ago. She obviously had the same philosophy as I do, never to throw anything out as it may come in handy some day.  There were box's of pots, drainage mesh, lots and lots of used wire, and some packets that hadnt even been opened.   Thankyou Helen, I'm sure you were smiling down on the club members that left our workshop this afternoon with some of your goodies, happy knowing that they will be used and not stuck in a dark wee shed somewhere never to see the light of day again.
Thats the beauty of bonsai, pretty much everything you use can be recycled and passed on to other enthusiasts - the pots, wire, mesh, tools, even sometimes the bonsai.  Most importantly the knowlege can be passed on.....over and over again and it doesnt cost anything to share.

Tuesday, April 12, 2016

BONSAI POT GLAZE TEST RESULTS

NEW WEBSITE :   Fionna's Bonsai Pots

I'm using a new website for both Blog Posts and for Selling my Bonsai Pots.   Click the above blue link to be redirected. Thankyou.

_____________________________________I could hardly contain myself.....it was time to open the kiln and see what the results were, with the test pieces from the old stoneware glazes I'd acquired recently.
They all turned out reasonably well.  The white ones were nothing to write home about, but I'll add it to another colour to see what happens.
Wow!  Even though I dont use blue very much on my bonsai pots, this colour just blew me away.  The dark dark blue doesnt look much on the pic but in real life its a stunner.  On the white clay it is very vivid, the cobolt  in the glaze is a very strong colourant.  Will definitely use this one.
This one was interesting.  On the stoneware clay it was nothing much, but on the white clay the glaze broke to brown on the ridges and almost a greeny pink on the rest of it.  I dont use white clay much because of the cost, but when I do, this glaze will be put to use.
This was another interesting one.  On the white clay it looks almost stonelike. Quite thin. but with black brown speckles, looks a bit like dark stone.  Another which I will definitely use.
This was dipped in one of them, probably the white one, when filling a gap at the top of the kiln...while I wrote down the test colours for the rest, this one was missed.  Love the bubbly look.
This is another one that I will be using again.
This was the biggest surprise of all.  This squared up pot was given 2 coats of the dark blue glaze and then a bit of the white glaze was squirted/dribbled down it.  I figured it was a test kiln full, so why not try it out.   So pleased I did....perhaps not the most "quiet" pot, but it'll suit something.   Will try the dark dark blue on its own, it might be nice matched with a golden yellow/ red foliaged bonsai perhaps.
The trouble with using unnamed glazes is that you cant really recreate them again after they run out.  With a bit of know how you can get close, but I"m still learning that "know how".